Safe navigational practice when you are in the mountains.
Our collective knowledge is built on many years of experience, including occasions where we have become misplaced. That is not a particular issue in isolation, providing you have the knowledge, skills and thinking capacity to both recognise the situation that you find yourself in, and more importantly, have the competence and capability to ‘fix it’
What we wish to share with you is some rock-solid guidance that should help you remain safe outdoors, but also may enable you to ‘set yourself free’ whilst in the countryside to enjoy all the fresh air benefits that being a Hill and Mountains lover brings to mind, safe in the knowledge and confidence that you can return safely off the hillside when your day is done.
The 5 D’s of Navigation.
1. Distance
2. Direction
3. Duration
4. Description
5. Danger
To adopt these key areas into your own personal kitbag we need to expand a little on each to help put context around them.
Distance:
Of course, it’s very important to understand just how far you will be travelling when you are planning your day out, and in order to do so there are several things at your disposal to enable you to calculate this with a good degree of accuracy.
Use the grid lines on your map it’s the same for both Harvey maps or OS maps.
Be careful when you are using this method as the distance diagonally across a 1km grid square is 1.4km
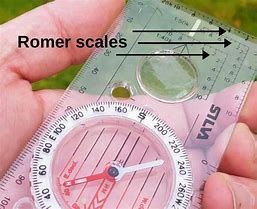
Using the Romer scale on your compass to calculate linear routes, Fig 1
Checking the scale on your map ; IE a 1:25000 map tells you that for every 1 millimetre on your map, it is the equivalent of 25 metres on the ground.
Finally, use a piece of string and carefully lay it over the track you are following, and then finally pull it tight counting the number of 1km grid squares it crosses.
Direction:
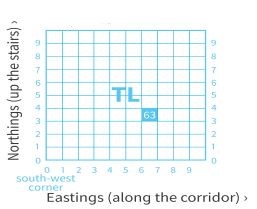
First and foremost, you will know that the grid lines on your map will run North to South (eastings) and East to West (northings), and that the top of the Map is grid North. Fig 2
Before you set off, set/orient the map. The easiest way to do this is to place your compass on the map with the magnetic needle pointing North ensuring that the Grid lines (north to south) are in alignment with the direction the magnetic needle is pointing. This is the basic setting of the map! Fig 3
Once the map is set you should be able to clearly identify several ground features that correspond with your now set map.
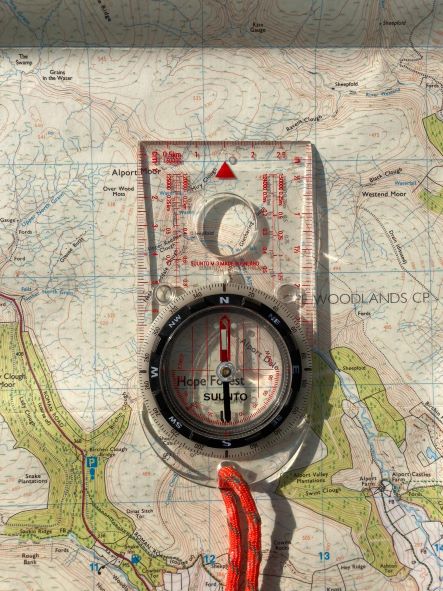
If the ground features you have identified are clear and obvious, then you will be able to set off. If you are working in rugged open ground or an area where precise direction is required, you will need to ensure that you are confident on how to take and use a bearing with your Silva compass.
Duration:
Now we understand how far we are going to travel, and we have a solid grasp of the direction we are going to go, our next step is to calculate how long it is going to take to get to our check point.
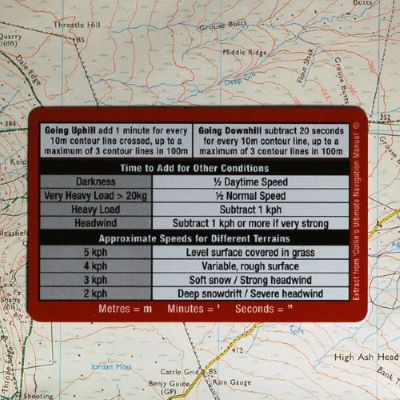
When calculating timing it’s good to know what pace you will typically walk at IE: I walk at 3kph, therefore if my distance to the next check point is 2 km, the time it will take will be 40 minutes. Fig 4
Also you may need to take into consideration other aspects like wind speed, whether you are travelling up hill/downhill, the type of terrain (is it easy paths or bog hopping across the moors), the pace of the slowest member of the party (assuming you are not going solo), visibility (we naturally will travel slower at night) weight you are carrying etc. Fig 5
When traveling uphill you will need to apply Naismith’s rule, which is a helpful calculation to plan timings. To use this, you need to apply one extra minute for every 10m contour that you will climb EG: You are walking to a location 2 kms away at a pace of 3 kph, but you will be climbing 600 metres to the top of a hill.
2 kms @ 20minutes per Km = 40 minutes + 600 metres of climb (600/10) = 60 minutes, therefore your total journey time for this leg is 1Hr and 40 minutes.
Description:
This part basically details what you expect to see on the way. Most of these observations will be taken from your studying of the map and your route.
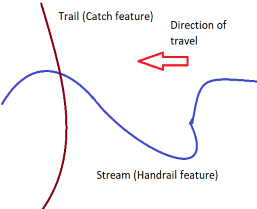
Look for terrain features like, streams, boundary fences, ridges, forests, rows of grouse butts. (handrails and linear features).
You will use these as your collecting features or tick points to confirm that you are travelling on the right route.
You will also probably have a catching feature that you will have located on the map, this should help you to know that you have arrived at your pre-determined check point, and may also be used to alert you if you have over shot your objective. Fig 6
Danger:
This bit is especially important, as we should always look out for potential hazards that we may encounter along our route. Things like cliffs, ridges, roads and streams can all be hazards that we need to be aware of to ensure our safe passage to our check point.
These hazards can be made even more difficult if the weather is particularly bad and where visibility is poor. If the weather is challenging or the terrain is particularly arduous, you will need to be greatly confident in your capabilities to move on an accurate compass bearing, coupled to excellent skills in pacing & timing if you wish to avoid becoming a statistic for the local Mountain Rescue team.
Martin (Compass)&Chris (Clogs)


